A Harmonic corner of the internet

IKEA pedalboards for all sorts of guitar pedals

Written by Melody

i originally posted this on a forum, but i felt like i should document this for anyone who's interested in building their own pedalboard on the cheap! i picked up the bass guitar about a year ago. i’m not good but i’m okay at it! i tried learning the regular guitar (so small, such thin strings!) several years ago, but it never stuck since it was pretty unfamiliar to me. it was a lot easier for me to jump from cello to bass, especially because i can read sheet music the same on both instruments with the right tuning. either way! i had a couple effects pedals, and needed somewhere to put them that wasn’t just piled in a drawer somewhere! on top of that, my wife is learning guitar, so hy needs a place for hys pedals eventually.

we did a little digging on sourcing cheap wood or briefcases or something, but we didn’t really find anything suitable at the reuse and thrift stores around us. so we took to the internet and found an Instructables article, DIY IKEA Pedal Board. i took a look at it, and roughly based something on it!

the tools i used were:

  • hacksaw (any saw works)
  • screwdriver
  • drill
  • bastard file (any file works)
  • two foam brushes (you'll need more for more coats)

my materials were:

differences from the instructables article were pretty small. i cut the back panels out of the bottom panel of the crate, rather than the other side panel. this was so i could make two pedalboards out of the crate instead of just the one. after cutting the back panel, the cut surfaces were VERY uneven. i used the bastard file to flatten them so that they wouldnt interfere with the fit of the angle brackets. technically i have enough wood left from the narrower side panels to make one more pedalboard, a smaller one. i'm considering putting that together and giving it to a friend who's starting to learn guitar!

for the handles, i first drilled a hole the size of the screw threads from the front, so that any blowout was on the back side. then, because the screws were too short to go all the way through, i used a large drill bit with some tape around it as a very shallow depth stop, to allow the screw head to sink about halfway in. feet were easy to mount, just drill small pilot holes in the corners, screw the feet in, and then if it’s wobbly you can put a bunch of washers between the foot and the board.

ikea sanded these already, so despite what the can of minwax says, i don't think you need to sand the wood to 220 grit. i didn't! you will need some 220 grit sandpaper or 000 steel wool to use between coats if you're using multiple coats of finish, which i'd recommend if you think very high or very low humidity might be a problem in your area or where you might be playing. your pedalboard might warp a bit if the humidity changes a lot, which wouldn't affect how it works, but it would wobble until you adjust the feet.

altogether to make two boards cost about $30 in materials, and is around the same size as a $90 pedaltrain board. i plan to make padded messenger bags for these eventually! but i’m pretty satisfied with this. i’m sure it could have been cheaper if i’d been able to find wood at a recycling/reuse store, or a briefcase at a thrift store that fits things. if i were to do this again, i think i would apply a couple more coats of finish, since i only did one. the can calls for at least two coats, but i really didn’t want to wait or to smell polyurethane fumes around the apartment for that long. in the future i might print out some cable management clips to run underneath the pedalboard and help tame the spaghetti underneath. i’m really happy with how these turned out! my cat seems happy too, her tail’s even in one of the pictures.

click for pics:

both completed pedalboards, with pedals for scale

completed pedalboard, bottom view

completed pedalboard with handles, side view so you can see the angle it sits at
LM386 speaker for my eurorack synth

Written by Cerena

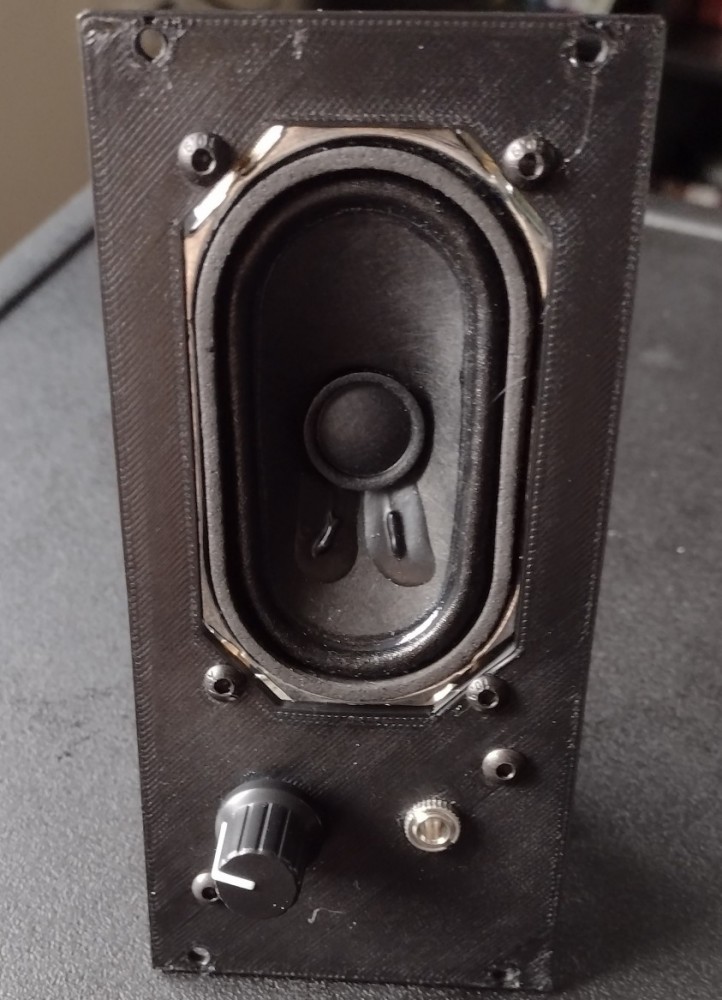
We're starting out by covering one of our first modules. This speaker was probably the fourth module we made for the synth, assembled on perfboard and attached to a 3D printed panel. Despite some issues I ran into while designing it, I think it came out alright:

A picture of the front of the module. It has a black rectangular panel, with a speaker taking up the top two thirds of the panel, while a knob and a 3.5mm jack sit below. There are no labels on this module.

Initially, I had planned to make something based off the Little Gem MKII by runoffgroove.com but when I assembled it on a breadboard, I couldn't get it to output any sound, despite following the schematic. To eliminate variables, I had powered it from my bench power supply and I was sourcing audio from my MP3 player's headphone jack, both things I knew worked fine. I traced the audio path with a pocket oscilloscope, and it seemed to be working alright up until it hit the amps. I just couldn't get sound out the other end, only a small DC offset. The LM386 chips I have on hand may be counterfeits since they probably came from Aliexpress, but I've had them too long to remember for sure. Either way, I had to come up with something different, and I cracked open the datasheet for the LM386. The example circuit given by the datasheet worked, and the speaker made noise! I played around with Texas Instruments' bass boost example, but ultimately, it took off too much headroom. The chip ran way hotter than it needed to, and it just wasn't loud enough to be heard well in a quiet, medium sized room. This wasn't intended to be a hi-fi studio monitor, so some bass rolloff would be fine. A splash of power filtering and a bidirectional power connector later, here is what I ended up with:

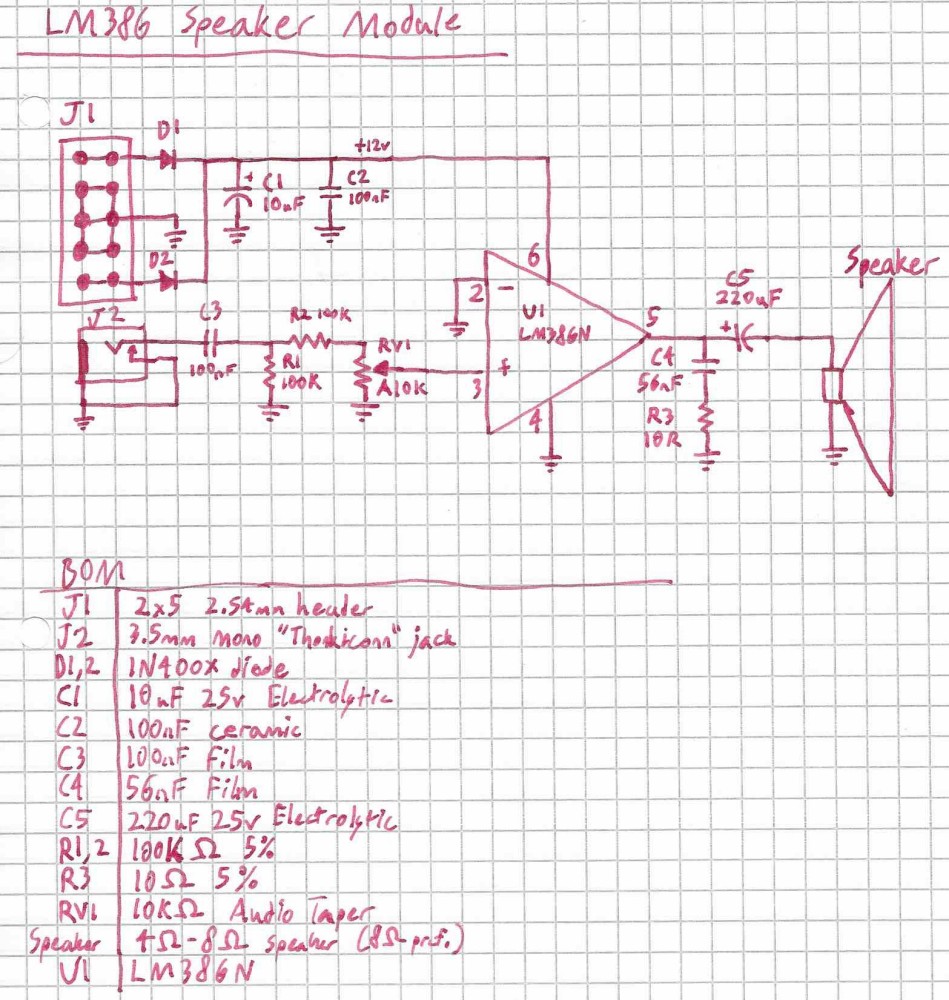
A scan of my schematic. It's a little hard to describe, but it's titled "LM386 Speaker Module", the center of the page contains a simple schematic, and below lies a bill of materials

To explain - the audio path including and after the volume pot is entirely copied from the LM386 example circuit in the Texas Instruments datasheet. I don't think I can get much better than that. Before the volume pot though, I needed some basic protections. Eurorack audio signals run at a different voltage range than the LM386 expects. If I feed the raw signal directly in (by turning the volume pot all the way up) then it's going to overload the input stage, and it definitely won't have room for any gain whatsoever. I inserted a voltage divider to prevent the module from clipping hard all the time, and to prevent it from drawing too much current from the output stage of whatever it's plugged into. Additionally, there is a coupling capacitor to make sure it doesn't pass DC into the speaker. It would be pretty tragic to go to all this trouble just to burn up my speaker.

On top of all that, we have some basic power handling, in the form of a couple diodes on both sides of the power connector, and a couple of decoupling capacitors on the +12v rail. The diodes make it so that whichever way the power supply is connected, only the +12v rail will ever be connected, and it'll be like the -12v rail doesn't exist. Since I was planning to assemble this on a tiny slice of perfboard, it would be really inconvenient to have a huge shroud around the power connector. It would block the holes for the mounting screws, and it would mean I have to put even more pressure on the module when connecting/disconnecting power. That's just not a great idea on flimsy perfboard with two screws. A bidirectional power connector means I have less headroom to work with, but that doesn't actually matter. The supply voltage of most LM386 chips cannot exceed 14V, and the heat dissipation would become an issue before reaching the limit of the voltage swing. It just all made sense together!

The speaker isn't listed on the BOM because I wasn't sure what I was going to use at the time. I was testing with a bookshelf speaker, and with a speaker ripped out of a weird talking greeting card. After some searching (since speakers are kind of expensive) I decided to order a few from Tayda Electronics while I was ordering parts for another module. I settled on A-3584, and it fit very neatly on a 12HP panel. I did end up having to change the layout of the panel a bit, as it has ears that are set very far back from the front side of the speaker. The product photos don't really show it well, but I'll link some more photos of the back down below, so you can see what I mean. I ended up attaching it with M3 standoffs and lock nuts, so it would sit relatively flush with the panel, and wouldn't be in the way when I reach for controls on the synth.

I couldn't leave well enough alone though, so I did add the TI bass boost circuit, but put a jumper on the board so that it could be toggled on and off. It's really a pleasant effect on a speaker this size, it's just paired with a wimpy little amplifier. If I need to demo it to more people than just me, I take it off so I can have a little more volume. I also added a stick-on heatsink to the IC to help mitigate the heat. I didn't add these modifications to the schematic, but you can see them in the images linked at the bottom of this post.

In retrospect, I probably could have increased the input impedance further, but it won't matter unless I plug it directly into a VCO or similar. I'd love to redesign this with a more efficient chip, but this was explicitly done with things I had on hand. (and one speaker that I ordered from Tayda, eventually) I also should have chosen a speaker that actually has flat mounting ears. If I had ordered Tayda part number A-4341 it probably would have been easier to mount to the panel, and I could have made a speaker grille part of the panel itself. As is, the foam spacer built into the speaker doesn't touch the panel. I'm not sure what effect that has on the sound, but it's probably alright.

Additional photos:

Electronics on perfboard, pre assembly

Assembled module, rear view

Assembled module, rear view alternate angle

Project files:

Blank Panel Generator, OpenSCAD

12HP Blank Panel, STL

LM386 Speaker Module Panel, OpenSCAD

The perils of making a simple website

Written by Cerena

This has been a long time coming. I honestly have been trying to start up a blog for a while, and every so often, it has worked! However, I haven't really kept one up for very long, and I think I now know why. Technically speaking, scope creep has killed every attempt so far - once I have something working, I start thinking about how I can prevent myself having to set it all up again.

This happens even if it's all static files and raw HTML. I still have the rest of the setup for the server itself, and I keep trying to use reverse proxies to try and route requests. This would be fine if I had an easy way to backup /etc, and to backup package lists, and to backup dotfiles, and restore everything every time my VPS providers catch fire or lose my data. I've had to restart my entire setup and config six or seven times now? I'm sure this is because I use cheap VPSes and providers who aren't huge orgs like DigitalOcean or AWS - but I have to for my own sanity. I really don't like relying on centralized services, both from a privacy standpoint and from a more personal desire to have my own corner of the internet be infinitely customizable, in a way many shared hosts cannot provide.

On my old sites, I used to host a Mumble server as well for my friends to use. We would frequently become frustrated with the quality of voice chat in video games, and we'd either use Teamspeak or Mumble depending on who had their server working that day. I certainly can't do that with a shared host that has a wordpress admin page built into their control panel. These days I have less use for Mumble as everyone seems to have moved to Discord, or Matrix/Jitsi/XMPP for the cool kids. I still would like to have custom, raw HTML pages though, so the cheapest shared hosts still aren't an option for me.

VPSes have the issue of differing operating systems and frequently, different kernels. Normally this wouldn't be an issue, but I can't export a list of packages I've installed and simply import them on another server - I have to make sure the packages are named the same on my new provider's Debian distro as they were on my old provider's CentOS machine. This also means config files are frequently found in slightly different places, or even different formats sometimes, and some services won't start if my provider is using a kernel that's too old or is compiled with different options. I'm fine with this on a per-server level, since I don't really mind going through the process of setting up a server most of the time. The issue arises when I have to do it multiple times, and do it differently each time. I forget steps, and I spend hours trying to figure out what I missed, how to work around new problems, and how to get the services I had running, running again.

I tried to solve this by using Ansible, which worked great for small things. It helps make sure I have all the right packages installed, all the right files on the servers I want them on, all run from my laptop wherever I decide to make changes from, all in one command. I can bring up a server to my specification in minutes. I bounced off of it several times, probably partially due to ADHD. That wasn't the entire issue though - it was very difficult to conceptualize the config files I already knew in YAML. It's hard to wrap my head around reading playbooks and configuring config files in a format that looks nothing like the config files I know, and having to have the actual config file open to the side anyways, then the sparse playbook documentation if there was any, the module documentation if there was any, then figuring out whether there should be something stored in the vault as well, and accessing that each time. I have multiple monitors, I had several windows open at all times, and I had my laptop next to me, but I could not figure out a good workflow to save my life. It felt like I couldn't get any momentum even if I knew the service and how it should work already, and having several sets of documentation open, especially for new programs I wanted to try, was absolutely overwhelming.

None of this should have stopped me from having a long-form blog running, but it always fell by the wayside as I struggled with other issues on the same machine. It never felt like it was as important as the other problems I was dealing with, or as important as having a git repo I could access from anywhere, or as having a password database I can sync to, or a shell server I could jump to my other machines from (as examples). These are all little things, but I'd always forget why I was doing it, who I wanted to share anything with, in the storm of yaml and ini and json.

I realized if I want to share anything, I need to get back to the basics. A small long-form blog, on a server I wasn't fucking with configs literally all the time, as static pages, that anyone can access anytime, separate from my other projects and their associated maintenance. I remembered signing up for a tilde.town account years ago, and I'm happy to report they're alive and well! I'm bringing things back here - a small blog generated with Pelican to start, where I'll post about things we make, the stuff we do, and then some static pages in normal HTML and CSS to brush up on the basics.

I'm doing this in Pelican so that, if they want, the other two who share my body can contribute as well. This will be the same long-form blog, we'll just post as different authors. Posts will be tagged and categorized, so they should be easy to sort through once we've got a few written. The best part is, these are still static pages. If I'm understanding Pelican correctly, you won't need to worry about cookies. Minimal JS on the page, no tracking scripts, the most that'll happen is that tilde.town can see IP addresses of people that visit. I don't think that they do anything nefarious with information like that. It's cozy here. I have a plant growing in my shell. I can talk to people and ask for help and talk about fun stuff instead of getting lost in the weeds and getting frustrated with trying to run one server for all my ideas. I think I'm going to ditch the idea of running a VPS that does everything for me, so you'll be able to find me here for a good while.

Catch you later!

-- Cerena

Find us on fedi!

a member of the updated tilde.town ~ring

random ~user | random ~box | next ~user

join